This method can be applied in situations like when you cannot send or receive email as well as if you cannot get the email server to connect. It may be necessary for you to update the email server settings and ensure the settings are correct and working fine on a home computer. To make sure you are using the correct settings, please contact your email provider or ISP to verify the correct email settings for your account. Also ensure you are connected to the Internet.
If you're in need of further assistance in changing the email settings on your Galaxy S5 device, then you too may refer to this guide and perform the following steps whenever you're ready.
1. Get to your phone and tap Apps from the Home screen to begin with.
2. Next, tap on Email.
3. On the next screen, tap the Menu icon located on the upper-right corner (represented by a three-vertical-dots icon).
4. You will be prompted with a list of options. Scroll to and tap on Settings.
5. From the Settings screen, tap on Manage accounts to view available accounts on the phone and edit your preferred email account settings or the one that's having an issue.
6. Tap on the account you want to configure or fix.
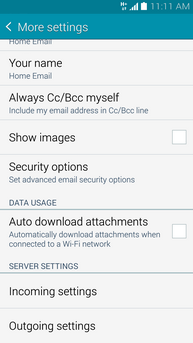
7. Scroll to and tap on More settings to continue.
8. Under More settings, you will see the available options to configure. The most common settings to edit or change are the outgoing settings, so scroll to and tap on Outgoing settings.
9. Tap on SMTP server from the Outgoing settings screen.
10. View and edit the SMTP server name if necessary. Be sure to enter the correct information for this field.
11. Next, scroll to and tap on Port to view and check the port number. To edit the port number, just erase the existing one (if there's any) and replace it with the correct port number.
12. After ensuring setting is configured correctly, tap on Done to save the changes you made.
The process is actually similar on most email accounts. The available options that can be changed may vary depending on the account you're editing or working on, like Gmail, Yahoo!, Outlook, Microsoft Exchange, etc.